
Recent conversations with a couple of clients raised the issue of how to effectively insert images into a Word document, so, as I produced a short “How to” for them, I thought that I’d share it here…
Insert images into Word
Whether we write our document first and then insert our images, or insert our images and add text to explain them or write our document and insert our images as we go along, the process is the same.
For these notes (and to easily show the impact of our actions), I’ll be inserting an image into a document that has text…
Choose where to insert the image
The first stage is to decide where I want my image to go, so I place my cursor where this needs to be ❶, then from the Insert Tab ❷, I select the type of illustration that I’d like to insert ❸. If it’s an image on my computer (or network), then I select Pictures

Find your image
This then allows me to use Explorer to locate the folder where my image is stored ❶, select the image ❷ and click Insert ❸…

This will insert the image at full size into my document…

As the image is selected, you will be able to see the 8 selection handles (to allow you to resize the image – if you want to keep the proportions of the image the same, then use the ones at the corners to resize your image – more about that, below), the rotation arrow (at the top of the image) and the Layout Options button at the top right of the image. The default is for Word to insert an image Inline with Text, the Layout Options allow us to amend that…
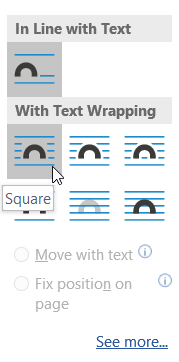
Hovering over these gives a (very) brief indication of the impact that that option will have on your image which is also illustrated in the small image…
The options where you want text to wrap around your image are…
- Square – whether your image is square or an unusual shape (from circle to freehand) this option treats your image as though it was square
- Tight – allows your text to follow the shape of your image
- Through – allows your text to flow through your image
- Top and Bottom – allows clear space either side of your image with the text breaking above your image and continuing after it
- Behind Text – this allows your text to flow across your image. However, you need to be careful as depending on your image, it can make the text very difficult to read
- In Front of Text – Your image will block out any text that is behind it
Choosing any of the word-wrap options, then allows you to select the image with your left mouse button & drag it around your document to best fit as can be seen

Resizing your image
There are two ways in which you can resize your image…
The first is to select the image, go to the Picture Tools Format tab ❶ & change the sizes of the image❷

Alternatively, point to one of the resizing circles around the edge of your image, hold down your left mouse button & drag in or out to reduce or increase its size. A couple of warnings with this…
- Use the circles at the corners of your image to retain the proportions of the image – using the ones along the edge can end up with some very strange images! The enlargement or reduction will move away from or towards the diagonally opposite corner
- If you hold down your CTRL button at the same time, then the enlargement/reduction will be relative to the centre of your image
Colin as always this is awesome. I have added images at Alice but was always frustrated at how to get the text to go around the image! This is ace 😊